Wordbot’s Keyword Density Analyzer Online Tool


When writing content for SEO, using a keyword density analyzer online tool to measure it’s keyword usage (keyword counts and density) is important for several reasons.
You need to make sure you actually used some of the keywords you’re targeting so search engines know what your article is about. At the same time, you don’t want to use too many keywords. If you do, your content will be difficult to read and signal to Google that you’re stuffing it with keywords just to improve your rankings. The best approach is high quality content with well-balanced keyword distribution and the best way to do this is use a keyword density analyzer tool.
Wordbot provides just such an online tool for analyzing your keyword usage and density as well as your top competitors’ usage and densities. The tool is named SEO Insights and in this article, we’re going to explain the importance of analyzing keyword density in your content and how wordbot’s SEO Insights Tool can help. The tool can be used for free on your own content or for a monthly price to include your competitors. To read in depth about the entire SEO Insights Keyword Competitor Analysis tool, click here . Let’s begin by talking about what keyword density is.
What is keyword density?
Keyword density is the measurement of how often you use a keyword in your content. It’s a great way to make sure you are using your targeted keywords enough, but not too much. It’s calculated by taking the number of times the keyword appears in your content divided by the total word count of your content. For example, if I have content that is 2,132 words which includes the word tool 42 times, the keyword density of tool is 42 / 2,132 * 100 = 1.97%.
Why is keyword density important?
Keyword density is important because as mentioned earlier you don’t want to underuse or overuse a keyword. Underusing it means you may not be sending a strong signal to search engines regarding what your article is about – it’s topic. Overusing it makes your content spammy and difficult to read. But there is another more specific reason to monitor keyword densities – you want to match the best ranking content for the targeted keyword. And you can’t do that by just counting the occurrences of the word. Let me explain.
Take our tool keyword example from above. It was used 42 times and had a density of 1.97%. But let’s pretend we analyze the keyword density of the top-ranking webpage for the term tool. It uses the term 33 times, so initially we may think “I’ve beat them on usage and should be good because I used the word tool 9 times more than they did”. But by analyzing the density, you see that their article was only 1,200 words, which means their density is 33 / 1,200 * 100 = 2.75% which crushes your 1.97% usage.
This is a prime example where although you used the word tool more times, you need to review your content and add it several more times to try and match that 2.75% and maybe even target 3%.
How do I easily measure keyword density?
Using the example above, you obviously can’t manually sift through your content and your competitors’ content and calculate the density of the words. Luckily, there are many keyword density analyzer online tools, including ours.
We’ll get into how to use our tool later in this article, but let’s review how to determine a correct keyword density for your content. Some online resources will throw out arbitrary percentages such as “your main keyword should be in the article 5% of the time” or some other vague statement. We believe in using proven, factual data that will get results. How do you do that? Simple, you look at the keyword density of the top webpages ranking for the keyword you’re targeting, just like we did in our above example.
And that’s exactly what our keyword density analyzer tool does. Accessed online via https://wordbot.io, it provides you with a keyword heat map of your content and its top 10 competitors (top 10 results as ranked in Google). You can see the absolute numbers of the keywords used as well as the keyword densities. This gives you true keyword density benchmarks and an action plan to improve your content.
Access the SEO Insights Keyword Density Analyzer Online Tool
Before we delve into analyzing keyword density, let’s explain how to get setup with the tool. First, visit https://wordbot.io and click the green Sign Up button at the top right of the website. There is no credit card required and signup should take only a few seconds. After signing up, you will be logged in to the software and directed to the Create tab, which is our suite of AI tools for writing and rewriting content. The SEO Insights Tool is located inside the SEO tab represented by a blue diamond. Click that.
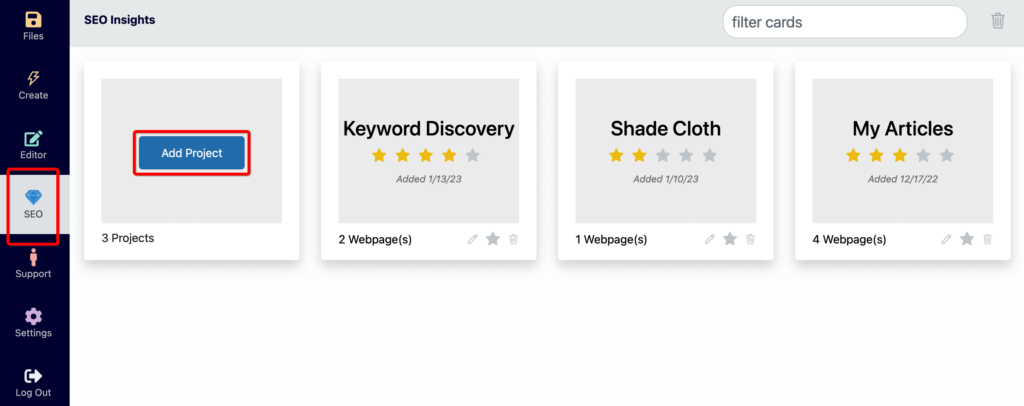
Add an SEO Insights Project
Within this tab, you’ll do all your SEO analysis, including analyzing keyword density and usage. The first step is to click the blue Add Project button. For most use cases, you can simply enter a project name and click the orange Add button to create the project. You can think of a project as a collection of related webpages that you want to do competitive keyword analysis on.
My Projects Screenshot Explained
You’ll notice in my screenshot above I have three projects named Keyword Discovery, Shade Cloth, and My Articles. Let me briefly explain what each of these projects are so you can better understand how to group your projects.
Keyword Discover Project
This project I use for discovering new keywords to write about. As we dive into how to analyze keyword density and usage later in this article, you’ll notice my screenshots are for the keyword targeted in this blog post – keyword density analyzer online. This keyword was stored in my Keyword Discovery project because its a new keyword phrase I was considering writing about. I keep these types of potential webpages in this project to group together new keywords I’m considering targeting. I use the top competitor’s url for my webpage because I don’t yet have an article of my own (this will make more sense later).
Shade Cloth Project
This project was for an eCommerce client. One of their highest trafficked keywords is shade cloth. To keep this separate from my personal work, I made a project for it. All their webpages that need analyzed and improved are placed in this project. If you are an SEO professional who works for many clients, this is a great way to keep your clients’ work separate from each other. You could even name the projects using the client’s name. I don’t really do SEO work for clients and truth be told this is from an SEO professional that was reviewing our software, so the single keyword name for the project made sense.
My Articles Project
This project is where I keep all my analysis of my existing articles on this blog. Our SEO Insights Tool excels at analyzing the keyword density and keyword usage of existing content that’s already ranking, but not in the top 5. I use Google Search Console to select existing content to improve, add the webpages to this project, analyze them against competitors (the top 10 SERPS as ranked in Google), and improve them. I’ve seen great results from doing this that I’ll share in future blog posts.
Add an Article or Webpage to Your SEO Insights Project
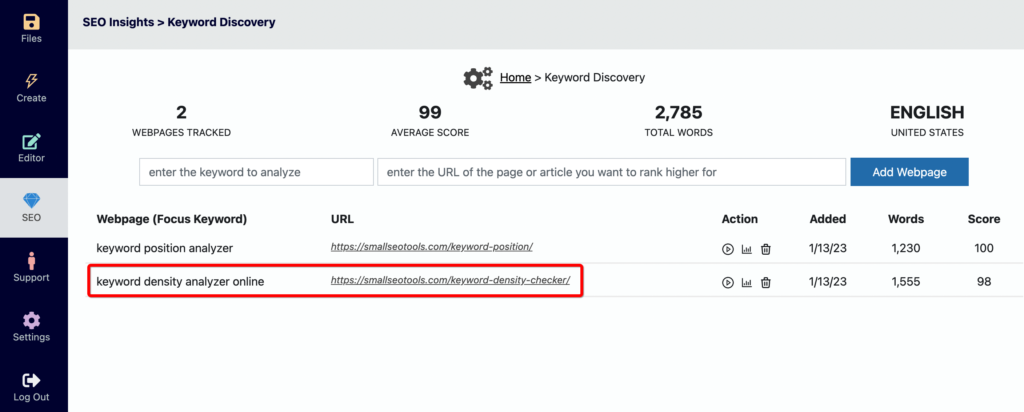
We now understand what projects are, how to add them, and we’ve added our first project. It’s time to add our first article or webpage. Enter the keyword you want to target and the URL of your content. If you’re analyzing a keyword that you haven’t written about yet or don’t have a webpage for, no worries. Just go to Google, search the keyword, and grab any search result URL to use (make sure if copying the URL directly from Google that you remove all the junk at the end of the URL). That’s what I did for my keyword phrase in the screenshot above. I hadn’t yet written this article, so I just entered the top competitor’s URL for keyword keyword density analyzer online.
Now we have our content added and the fun begins. For the rest of this article, it will be assumed you have a paid wordbot.io account. The reason is to analyze your webpages against the competition, you must have a paid account. On a free account, you can analyze your own URLs or single competitor URLs.
Once your webpage exists in the SEO Insights project, you want to run the Competitor Analysis.
Running SEO Insights Competitor Analysis
We have the keyword we want to target and the URL of our content. Now it’s time to run the SEO competitor analysis.
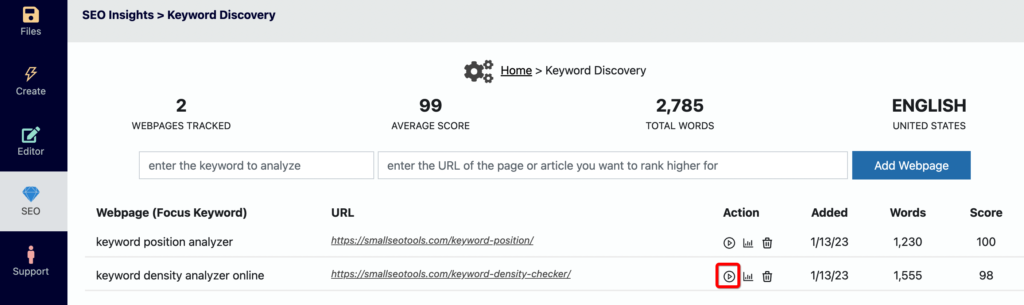
Click the play button to the right of the webpage. A popup window will appear letting you know that the analysis may take up to 10 minutes and not to close your browser. In reality, we’ve found it usually takes between 2 and 5 minutes. Close the window and the analysis starts. You’ll see the play button turn into a spinner. Once the analysis is complete, the spinner turns back into a button.
This process does several things:
1. It pulls the top 10 search results for your keyword as ranked in Google
2. It crawls your webpage and the 10 competitors from Step 1 above.
3. It gathers valuable insight into on-page SEO items such as header tags, images, internal and external links, word count, and more.
4. It extracts and analyzes all keyword combinations across your webpage and the 10 competitors, including keyword usage and density.
Once complete, we’re ready to dig into the actual keyword competitor analysis by viewing the interactive heat map of your webpage and your competitors. This heat map is what we’re calling the keyword density analyzer in this article. It is an invaluable tool for analyzing keyword density and usage as compared to your highest ranking competitors. Using this tool, you absolutely can improve your content to outrank your competition. We’ve developed the tool using our own blog posts and can truly say it works. It was used to optimize this article you’re reading right now!
Let’s get started, click the graph button located directly to the right of the plan button. This will take a few seconds to build the heat maps and load the results into a popup. Once the popup appears, you’ll see a refresh button and up to 4 possible tabs.
The Refresh Button

The refresh button allows you to quickly refresh your webpage’s SEO stats across the tabs. This is handy for updating the stats as you make changes to your content based on the analysis from these tabs. For example, you use the keyword density analyzer and realize you need to improve one of your keyword’s density from 1% to 3%. You make the improvement and want the analysis to reflect your changes. You can click this button and it will update the stats in real time. As you make improvements, continue to click this button so your analysis and SEO Insights Score updates.
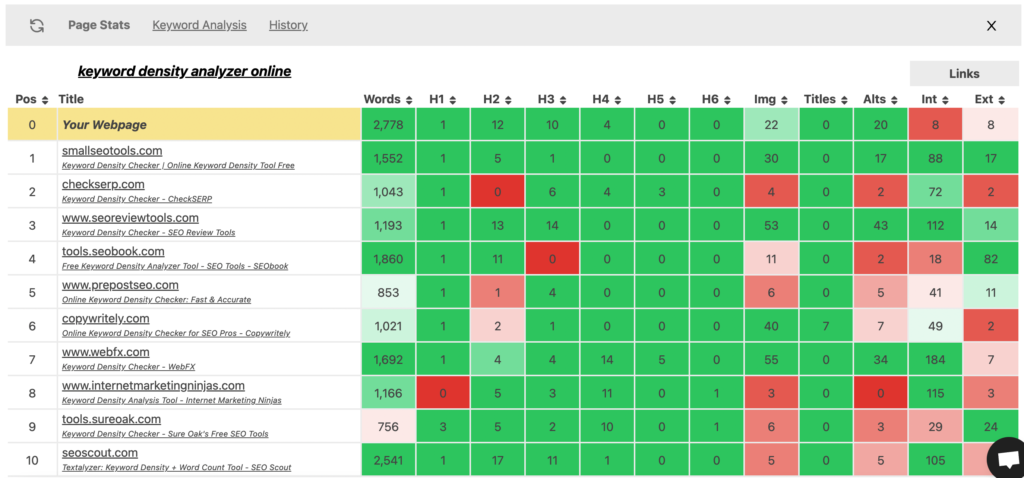
The Page Stats Tab
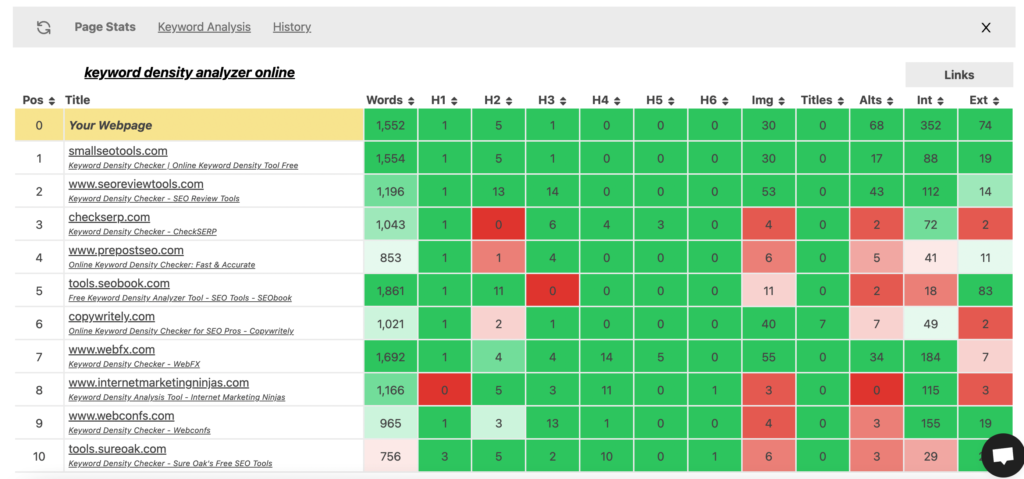
We’re not going to talk in-depth about this tab in this article, but know that it includes several valuable on-page SEO insights that you can and should use to improve your rankings. It includes your article or webpage links, your top 10 competitors links, their respective search engine ranks as ranked in Google, the word count of each webpage, and how many H1 tags, H2 tags, H3 tags, H4 tags, H5 tags, H6 tags, images, image titles, image alts, internal links, and external links. It also shows your targeted keyword at the top which you can click to open the Google search for that keyword in a new tab.
The History Tab
The History tab shows historical snapshots of your webpage regarding its Google search ranking and its WordBot SEO Insights score. The snapshots are taken every time you run the competitive analysis on the webpage, which is when the play button is clicked. If your Google ranking for the focus keyword is greater than or equal to 50, 50+ is shown, else the actual ranking in the SERPs is captured.
This screen is great for understanding how the keyword density analyzer tool has helped you improve your ranking in Google over time. You should see a correlation between increased WordBot SEO Insights scores and increased rankings in Google.
The Errors Tab

The Errors tab shows crawler errors encountered during the competitive analysis step. The tab itself will only appear when errors were encountered. Many websites have protections in place to block crawlers and bots. The SEO Insights Tool typically works with these blocking mechanisms, but not always, especially with large e-commerce sites such as Walmart, Amazon, Home Depot, etc.
If our tool is blocked from crawling a competitor’s site, it will list the site in the Errors tab along with the SERP position. This way, although we cannot show you the on-page and keyword stats since their code couldn’t be processed, you do know that those pages rank high and are top competitors.
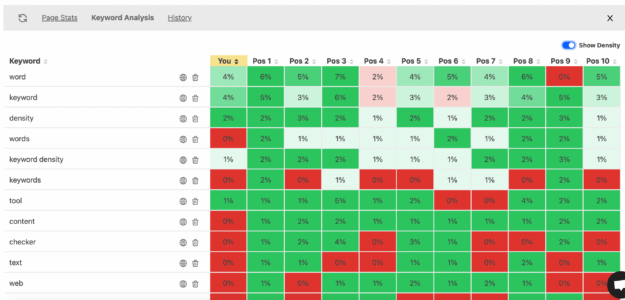
The Keyword Analysis Tab (this article’s focus)
This is the tab we’re most concerned with in this article. This heat map allows you to do a full analysis on your keywords. You can view the usage and density as compared to competitors.
Below is an overview of the tab.
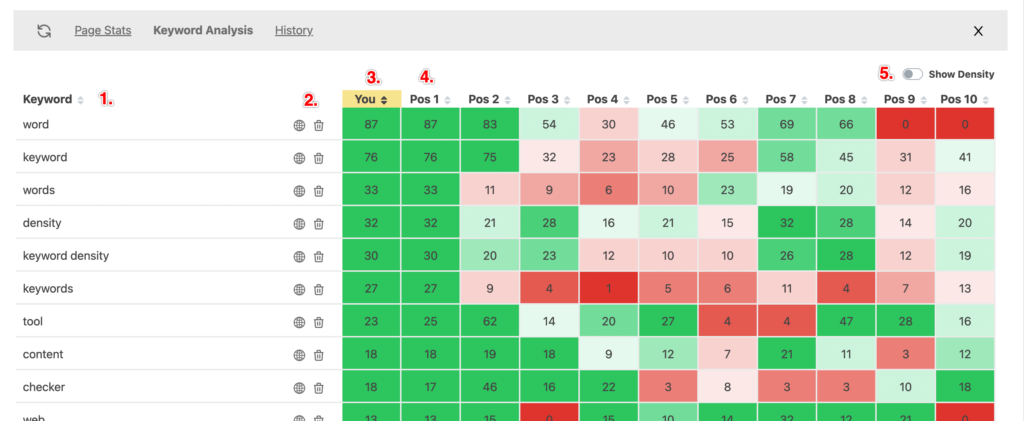
1. The Keyword column
This column shows all the keywords extracted and deemed important. At the time of this writing, any keyword that is found with a hit across at least 7 of the competitors will be shown here. Notice the double arrow icon by the heading. You’ll find this icon beside any heading that can be sorted. Click the icon to toggle the sort between ascending and descending for the column.
2. Removing a Keyword
Sometimes keywords will appear that are used across all the competitors, but you don’t feel are important to target. You can permanently delete these from the heat map and your analysis by clicking on the trash icon. This will permanently remove the keyword from this webpage’s SEO Insights analysis, but keep in mind it won’t affect this keyword on other projects and webpages being analyzed.
3. Your Webpage
The first column after the keyword column is title You and highlighted in yellow. This is the URL you originally entered for the webpage to analyze. If your webpage is also ranked in the top 10, you will still see this column representing your content, but will also see it as a competitor in one of the other columns.
4. Your Top 10 Competitors as Ranked in Google
The columns to the right of the You column are labeled Pos 1 – Pos 10. This means Position 1 through Position 10 and represents the top 10 competitors for the keyword you entered for your content. These competitors are as pulled for the search term in Google. You will typically see 10 columns, but if there were crawler errors, you may see less than 10 with gaps in the positions.
For example, Position 3 may be missing and instead listed on the Errors tab mentioned earlier in this article. Some sites block our crawlers, especially large eCommerce sites like Amazon, Walmart, etc. If you are analyzing articles, you shouldn’t see too many crawler errors. If you are optimizing eCommerce webpages, you will often see a few crawler errors on the large retail websites that often rank in the top 10.
5. Toggle The Analysis Between Keyword Usage & Keyword Density
The keyword heat map defaults to the keyword usage. This is the concrete number of times the keyword was included on the webpage. We’ll discuss how to use this number for analysis further down in this post. For now, just know to view keyword density, you use this toggle. You can quickly toggle between concrete keyword usage and keyword density.
6. Showing Keyword Density
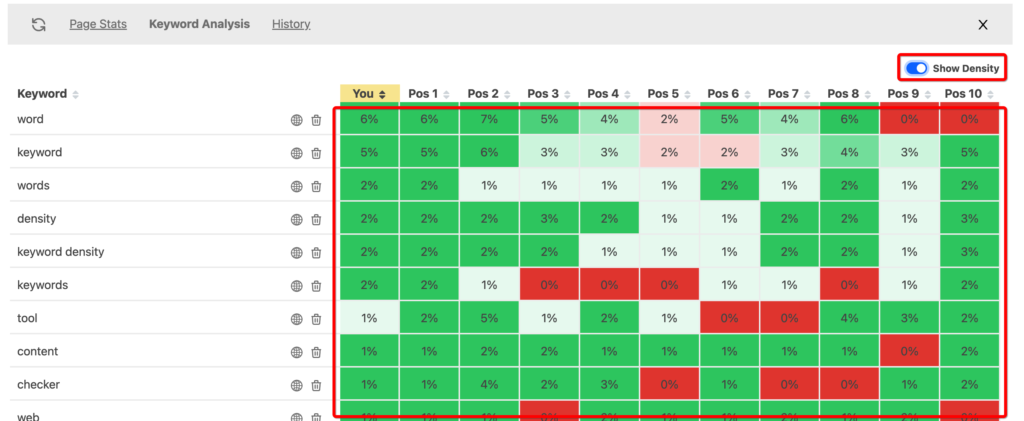
You’ll see the heat map change from showing the number of times the keyword is used to showing the percentage of the keyword as compared to the webpage’s word count. This allows you to view the density of your webpage’s keywords and the density of all your competitors. You can use the top competitor’s densities to determine if you need to increase or decrease yours. Having too low a keyword density will cause you to struggle to rank against your competitors while having too high a density can hold you back from appearing to be keyword stuffing your content.
Using this keyword density analyzer online to compare your stats to competitors is much more accurate and valuable as compared to targeting arbitrary numbers like 2%, 5%, etc. The densities in this tool come straight from the best ranking pages in Google, so you know Google thinks highly of the keyword usage and density for these pages or they wouldn’t be ranking them in the Top 10.
How to use SEO Insights Tool to Analyze Keyword Usage and Keyword Density
The keyword density analyzer online tool allows you to see the keyword usage and keyword density for your webpage and its top 10 competitors. This tool is invaluable for optimizing your keyword usage to be your competitors and rank high. Even if your competitors are strong in other areas of SEO, you can’t help to rank better by ensuring your keyword usage and density are inline with the best ranking webpages.
For this section, I took this article minus this section and entered it into our SEO Insights Keyword Density Analyzer Tool so I can show you a real use case for the tool. Let’s start by viewing the keyword heat map for my article (this one you’re reading) that targets the keyword Keyword Density Analyzer Online. After using the instructions mentioned in this article, I’m presented with the below keyword usage and density heat maps.
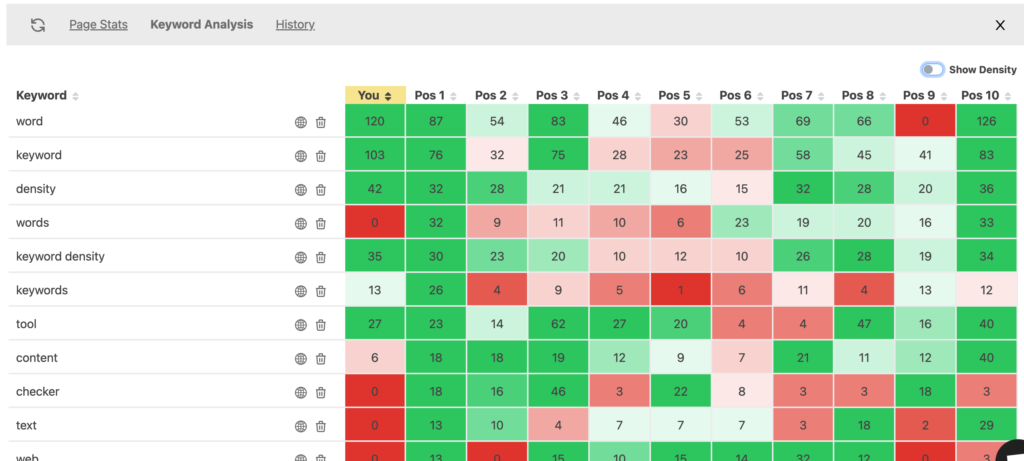

Analyzing The Results
Let’s discuss some actionable items from the above heat maps. First, notice in the keyword density heat map the terms keyword, keyword density, and keywords. For the first two, my keyword density is 1%, yet the top competitors is 2%. For the term keywords, I’m actually at 0% where they are at 2%.
Also notice, that when looking at the keyword usage heat map, I use the terms keyword and keyword density much more than my competitors. This is why it is so important when optimizing keyword usage to not just look at keyword counts, but also their densities. I use the words more often, but because my article is much longer than my competitors, I’m still under-utilizing the keywords. I need to consider bringing my densities up to match the top competitor.
Conclusion
Just from this small example, you can see how valuable this keyword density analyzer tool is. We only reviewed three keywords, yet the map is full of other meaningful keywords and insights. By working through the entire map, making improvements to your article, and iterating, you can optimize your article or webpage to be a leader in keyword usage without stuffing or producing poor content.